Some days ago I discovered ubiquity and I like it very much.
Because I use google define a lot, I wrote a very simple script for it.
You can find my script here: http://gist.github.com/45454 (I just changed the default google search script)
To use it, install the script, launch ubiquity and then just type gdefine [word], or type gdefine with a selected word and press enter. It's that simple :-)
I use this script all the time, so I hope it's useful for some of you! (there is already a define script but that uses http://www.answers.com but I don't like it as much as google define)
Other commands that I recommend: switching tabs (just type the name of the tab), tagging sites (tag [tag1 tag2 ...]), remember the milk commands (you can find it here), twitter
zaterdag 10 januari 2009
woensdag 3 december 2008
How I organize my gmail
Since I first started using gmail, I started using labels for everything. Every time I start a new project or subscribe to some mailing list I created a new label (mostly with a corresponding filter) without thinking too much about how I ordered them. At first this was no real problem, but after a while I had too much unordered labels. You can Imagine the clutter. The moment gmail introduced labs and with it, the quick links feature, I rejoiced. I started saving links for all my most used labels.
But this was definitely no solution for the problem. So I recently decided it was time to think about a real solution.
I started reading blogs about how other people organize their mail. Soon I came to the conclusion that all those solutions are good in a certain way, but they didn't suffice for me.
So In this post I'll explain what I do want, how my labels look now and what gmail still lacks.
The most important things are these:
But 2 more things would be great:
- Search labels with wild cards, so you can do something like this: search for "l:L-*" to search for all emails from mailing lists.
- Support for folders in the labels (there are plugins for this though, but official support would be great as the plugins don't always seem to work)
There is one more thing, but I don't think this is really a gmail thing. It would be great if desktop mail clients would now when an email has a double label. Not having to mark those messages as read twice would be great.
This sort of scheme will probably not work for everybody but for me it's great so far!
Now it's time to sort my google reader subscriptions.
But this was definitely no solution for the problem. So I recently decided it was time to think about a real solution.
I started reading blogs about how other people organize their mail. Soon I came to the conclusion that all those solutions are good in a certain way, but they didn't suffice for me.
So In this post I'll explain what I do want, how my labels look now and what gmail still lacks.
What do I want?
I want to organize my mail so that I don't need to spend much time organizing it (apart from spending quite a lot of time with this now). This means that I have to be able to quickly process and search mail.The most important things are these:
- I need to be able to access my most accessed labels fastest.
Quick search is a bit of a solution for this, but only a partial solution, it can still take some time to give a label to a mail if you have to search the label way down on the list. So my labels need a good and logical order.
- I don't want an inbox full of mails.
This means that I need to be able to label mail or to archive it the moment I read it.
- Things I don't need may not clutter my mail.
Archive/delete those messages at once. (I almost never delete mail)
- I don't want to spend my time on mail I don't need.
There are three things you can do here: If this is a message from something you can unsubscribe easily, do that, if not mark it is as spam and if that doesn't work, create a filter to mark the message as read and archive it.
- Be able to decide whether a message is important to read now or if it can wait.
Organizing my labels
I use a prefix to create a first ordering.
Things I am working on now, and thus have to access often have a _ as prefix so it's on top of the list:
_/study/project
If I'm finished with the project or task, I label them with a P (for processed and it doesn't clutter my first labels):
P/study/project.
When you rename this task, you can also add a timestamp for projects that return every year or every month, or you can sort the label more fine grained.
When you rename this task, you can also add a timestamp for projects that return every year or every month, or you can sort the label more fine grained.
Things I always need like personal or important mails, those I label with an A (for always and just below the _)
A/important
A/notes
If you have many labels that are only for personal use, you could create a secondary ordering for example A/me/important.
A/notes
If you have many labels that are only for personal use, you could create a secondary ordering for example A/me/important.
Other labels I use
things I almost never need: Z (way down)
If you create a label Z/unimportant you should delete that label and archive those mails as they are unimportant anyway! I use the Z label for backups of old mail, or for my starred messages as sometimes desktop mail clients delete all the stars.
The important remark here is that you should only label those messages with a Z that you want to find later, mail that you'll never need again needs to be archived.
If you create a label Z/unimportant you should delete that label and archive those mails as they are unimportant anyway! I use the Z label for backups of old mail, or for my starred messages as sometimes desktop mail clients delete all the stars.
The important remark here is that you should only label those messages with a Z that you want to find later, mail that you'll never need again needs to be archived.
mailing lists: L
You should make a filter for mailing lists. If you make the filter so that you never look at the mail anymore, you should unsubscribe from the list
You should make a filter for mailing lists. If you make the filter so that you never look at the mail anymore, you should unsubscribe from the list
You can use as many prefix as you want but a rule that I like is to keep most used labels on top with _ and A!
Things you can filter and don't need to access often doesn't matter much, make sure they don't get on top though.
Things that don't need a label
- all mail coming from one person, you can perfectly fine search for all that mail (from:person) and if typing that is too much, you can still create a quick link.
- unimportant mail.
I try to process all incoming mail at the moment I read it. If you do have to defer it, for example when you have too much mail and don't have the time to read them all now, make a label for mail that you should access later, something like __/reply or __/waiting. I personally don't have those labels. If I label them like that, I just forget about that mail most of the time. Things that don't need a label
- all mail coming from one person, you can perfectly fine search for all that mail (from:person) and if typing that is too much, you can still create a quick link.
- unimportant mail.
What with new mail?
I think it's more useful to distinguish between important unread mails and other unread mails. That's why I have always two quick links: "important unread" and "unread". When I don't have much time I only read the important unread messages, and I can always come back to the other unread messages.
If there are then still mails that cannot be processed right away, I keep those mails in my inbox, so that they are always there when I open my mail. But that are the only mails in my inbox.
If you have mail that you don't need it anymore, archive it.
Some tips
- For abbreviations I use all caps, other words with all small letters. (it doesn't matter what you use, but be sure to use it everywhere to keep things clean).
- I use simple and short names for labels.
- I write drafts of notes/text to myself and mail them to myemail+note@gmail.com. You can use the +note to create a filter and label those mails like this: A/notes. If I want to write nicely formatted text, I use google docs, and reply it to my note (the google docs gadget in labs makes drag and drop possible)
- I also have a filter for unwanted mail to mark the as read and archive/delete them, I use 1 filter for that, so I don't clutter my filters to much (this has the disadvantage that this filter becomes harder to edit if it becomes bigger).
- I don't keep a todo list in gmail because I forget to do those items, I use remember the milk for my todo list which you can integrate in gmail.
What gmail still lacks
Not much! that's for sure, it's becoming more and more feature complete with support for gadgets like google docs, calendar and remember the milk, quick links.
But 2 more things would be great:
- Search labels with wild cards, so you can do something like this: search for "l:L-*" to search for all emails from mailing lists.
- Support for folders in the labels (there are plugins for this though, but official support would be great as the plugins don't always seem to work)
There is one more thing, but I don't think this is really a gmail thing. It would be great if desktop mail clients would now when an email has a double label. Not having to mark those messages as read twice would be great.
Conclusion
I've been using this scheme now for some days and I haven't yet found any issues with it. One small thing is that you manually have to change the prefix _ to P for projects that are finished.This sort of scheme will probably not work for everybody but for me it's great so far!
Now it's time to sort my google reader subscriptions.
woensdag 6 februari 2008
My kde svn account
I applied today for an svn account and already have it :) so I just commited my first patch. It's a simple patch to the Picture Frame applet and also some refactorings. I'll sure be commiting more patches to plasma and kde.
I also made a techbase page with all the current known plasmoids. (I still need to add those from playground) you can see the page here: http://techbase.kde.org/index.php?title=Projects/Plasma/Plasmoids
I also made a techbase page with all the current known plasmoids. (I still need to add those from playground) you can see the page here: http://techbase.kde.org/index.php?title=Projects/Plasma/Plasmoids
vrijdag 18 januari 2008
I wanted an easy way of following some matches on the australian open. But since I couldn't get the IBM scoreboard working under linux1 I wanted to try write something myself.
So I've come up with something really simple.
I've just made a python script and with urllib2 I pull the results and format them simply.
Here is the script.
features:
show who's serving
truncate for maximum width (edit max_width in the script)
choose which players to follow (edit players in the script)
show the match winners
bugs/missing:
cannot show 15,30,40,AD,De (this should be simple to add, so maybe I'll add this later)
This script won't probably work for the double matches and if two
players in your list play against each other it will display the match
twice
how to use:
you can choose yourself but I use it in conky. (just add this line in conkyrc2: "${texeci 90 python ~/path/to/script.py}") (screenshot)
other possible use would be: a cron script and terminal, a superkaramba widget, a plasmoid,...
I know this is only a really simple script. There are probably better ways of doing this but it works and it was written fast.
If you have request, you can always ask, I'll see if I have the time for it (exams for now).
You can change the script as you like but if you made improvments it would always be cool if you shared them.
1Didn't work in konqueror, firefox nor opera (I have flash 9 installed), I wrote them an email about this but haven't yet received a response.
2To get conky working in kde I have installed feh and added this line to my conkyrc: "${exec feh --bg-scale `dcop kdesktop KBackgroundIface currentWallpaper 1`}" (source: http://briancarper.net/2006/08/25/transparent-conky-in-kde-part-2/ )
So I've come up with something really simple.
I've just made a python script and with urllib2 I pull the results and format them simply.
Here is the script.
#!/usr/bin/python
#The players you want to follow.
players =["Roger Federer", "Justine Henin", "Andy Roddick", "Rafael Nadal", "Maria Sharapova", "Lleyton Hewitt", "David Nalbandian", "Amelie Mauresmo"]
#The maximum width of the display (maximum chars)
max_width= 14
#Only change below this if you know what you're doing.
import urllib2
import urllib
url = 'http://www.australianopen.com/en_AU/scores/index2.html'
def find_player_in_data(player, data):
startString = '<table width="440" height="100" border="0" cellspacing="0" cellpadding="0" background="/images/scores/ao_sc_0000g5.gif"'
endString = '<sup></sup></td><td width="5"><spacer type="block" height="1" width="1"></td></tr><tr><td colspan="16" height="4">'
index = data.find(player)
if index != -1:
index = data.find(startString, index-200)
endIndex = data.find(endString, index)
return data[index: endIndex+len(endString)]
else:
return ""
def find_numbers(data):
lineBegin = '<td width="1"><spacer type="block" height="1" width="1"></td><td width="19" valign="middle">'
lineEnd = '</sup></td>'
first = 0
numbers = []
last = 0
while (first != (-1+len(lineBegin))):
first = data.find(lineBegin)+len(lineBegin)
last = data.find(lineEnd,first)
numbers.append(getNumber(data[first:last]))
data = data[last:]
return numbers
def find_game_number(data):
firstLine = '<td width="21" valign="middle">'
vet = "<b><b>"
first = data.find(firstLine)
if (data.find(vet) != -1):
return data[first+len(firstLine):2]
else:
return data[first+len(firstLine)+len(vet):2]
def is_serving(data):
""" returns if the player is serving or not"""
firstLine = '<td width="21" valign="middle">'
vet = "<b><b>"
first = data.find(firstLine)
return (data.find(vet) != -1)
def player(data):
start = '<td width="264" align="left" valign="middle"> <a href='
startNext = 'class="blue">'
end = "</a>"
winner_start = '<b>'
winner_end = '</b>'
first = data.find(start)
next = data.find(startNext,first)
end = data.find(end,next)
player_name = data[next+len(startNext):end]
if player_name.find(winner_start) != -1:
player_name = player_name[len(winner_start):-len(winner_end)]
win = True
else:
win = False
if len(player_name) > max_width:
player_name_list = player_name.split(" ")
first_len = max_width - (len(player_name_list[1])+1)
result = player_name_list[0][0:first_len] + " " + player_name_list[1]
return [result, win]
def getNumber(char):
if char[0].isdigit():
return char[0]
else:
return ""
def do(data):
if data == "":
return
lastBlock = '<td width="5"><spacer type="block" height="1" width="1"></td></tr><tr>'
firstBlockLastIndex = data.find(lastBlock)
first = data[0:firstBlockLastIndex]
last = data[firstBlockLastIndex:]
first_player = player(first)
last_player = player(last)
message = ""
if (first_player[1] == True | last_player[1] == True):
message += "Completed\nWinner:\n"
if (first_player[1] == True):
winner = first_player
else:
winner = last_player
message += winner[0]
else:
serving_1 = is_serving(first)
serving_2 = is_serving(last)
message = join_results(first_player[0], find_numbers(first), serving_1)
message += "\n"
message += join_results(last_player[0], find_numbers(last), serving_2)
return message
def join_results(player, numbers, serving):
result = player + "\n"
if serving == True:
result+= "* "
else:
result += " "
result += " ".join(numbers)
return result
data = urllib2.urlopen(url)
stringData = data.read()
for p in players:
data = find_player_in_data(p, stringData)
result = do(data)
if result != None:
print result
features:
show who's serving
truncate for maximum width (edit max_width in the script)
choose which players to follow (edit players in the script)
show the match winners
bugs/missing:
cannot show 15,30,40,AD,De (this should be simple to add, so maybe I'll add this later)
This script won't probably work for the double matches and if two
players in your list play against each other it will display the match
twice
how to use:
you can choose yourself but I use it in conky. (just add this line in conkyrc2: "${texeci 90 python ~/path/to/script.py}") (screenshot)
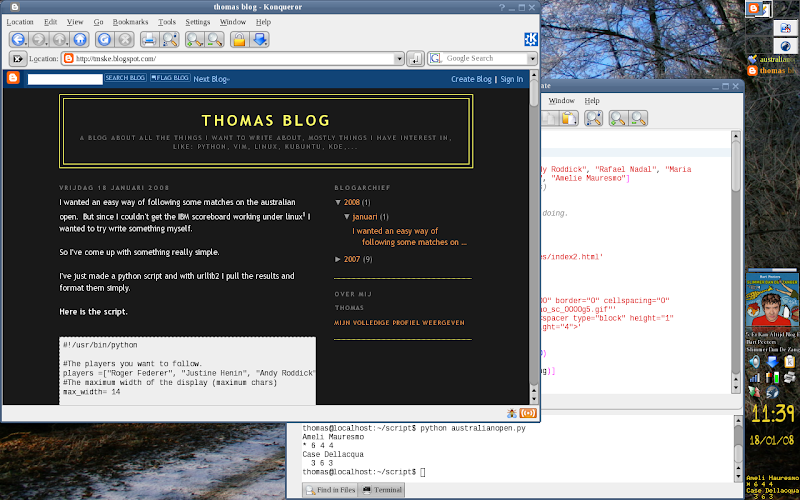
other possible use would be: a cron script and terminal, a superkaramba widget, a plasmoid,...
I know this is only a really simple script. There are probably better ways of doing this but it works and it was written fast.
If you have request, you can always ask, I'll see if I have the time for it (exams for now).
You can change the script as you like but if you made improvments it would always be cool if you shared them.
1Didn't work in konqueror, firefox nor opera (I have flash 9 installed), I wrote them an email about this but haven't yet received a response.
2To get conky working in kde I have installed feh and added this line to my conkyrc: "${exec feh --bg-scale `dcop kdesktop KBackgroundIface currentWallpaper 1`}" (source: http://briancarper.net/2006/08/25/transparent-conky-in-kde-part-2/ )
maandag 25 juni 2007
Finally some time
The exams are over so I have some time again to blog, and to continue work on snipper. I have some big plans for it :-)
I want to add some features,
fix some bugs,
make it easier to adapt,
make it easier to make it work on windows.
When I have done that, I'll try to write a plugin for some other text editor to use snipper, I want to see how hard that is, because I would love it if I could use snipper in more than one editor.
The advantages are obvious: you only need to have on template file per filetype and you can use it on all your editors.
This may be a bit of a dream, but it should be rather easy to let it work with at least some editors so I'll try it!
I still haven't got much time, so the development won't be too fast for the moment.
I want to add some features,
fix some bugs,
make it easier to adapt,
make it easier to make it work on windows.
When I have done that, I'll try to write a plugin for some other text editor to use snipper, I want to see how hard that is, because I would love it if I could use snipper in more than one editor.
The advantages are obvious: you only need to have on template file per filetype and you can use it on all your editors.
This may be a bit of a dream, but it should be rather easy to let it work with at least some editors so I'll try it!
I still haven't got much time, so the development won't be too fast for the moment.
dinsdag 29 mei 2007
Snipper 0.2 released
I've just released snipper 0.2,
snipper 0.2 is a completely refactored version of 0.1,
now it should work with python 2.4 and it also works when editing multiple buffers with different filetypes at the same time
download it here
or on vim.org
After this refactoring, I think I will be able to add new features much easier, so new features will be coming soon (but not too soon because I have to study also)
snipper 0.2 is a completely refactored version of 0.1,
now it should work with python 2.4 and it also works when editing multiple buffers with different filetypes at the same time
download it here
or on vim.org
After this refactoring, I think I will be able to add new features much easier, so new features will be coming soon (but not too soon because I have to study also)
maandag 28 mei 2007
Snipper video available
I made a small video of snipper in action, it's an ogg
http://snipper.googlecode.com/files/snipper-0.1-example.ogg
http://snipper.googlecode.com/files/snipper-0.1-example.ogg
zondag 27 mei 2007
Snipper
Snipper 0.1 released,
After some days of working on vim scripting in python, I wanted to try the real deal, write a script that is really useful, so I wrote a snippets script for vim.
For all of you who don't know what snippets are: snippets or templates are predefined pieces of text that you would like to insert in your text fast. You basically type an alias and press a button and the complete text is inserted.
I will be making a video of it soon but for now if you want more information, look at http://scribes.sourceforge.net/ or at http://macromates.com/, two cool editors for if you don't know vim :-)
So now everyone knows what snippets are, I can continue my explanation of my script that you can find on https://launchpad.net/snipper/, download it here
Documentation will be available very soon. (for installation and use)
This is the first version of the script, so expect some bugs. If you find any bugs that haven't been posted, please do (https://bugs.launchpad.net/snipper/)
I hope you like this script (if you do, please add a comment) and stay tuned for more info.
After some days of working on vim scripting in python, I wanted to try the real deal, write a script that is really useful, so I wrote a snippets script for vim.
For all of you who don't know what snippets are: snippets or templates are predefined pieces of text that you would like to insert in your text fast. You basically type an alias and press a button and the complete text is inserted.
I will be making a video of it soon but for now if you want more information, look at http://scribes.sourceforge.net/ or at http://macromates.com/, two cool editors for if you don't know vim :-)
So now everyone knows what snippets are, I can continue my explanation of my script that you can find on https://launchpad.net/snipper/, download it here
Documentation will be available very soon. (for installation and use)
This is the first version of the script, so expect some bugs. If you find any bugs that haven't been posted, please do (https://bugs.launchpad.net/snipper/)
I hope you like this script (if you do, please add a comment) and stay tuned for more info.
woensdag 23 mei 2007
some helpful vim tips
Hi,
In this blog I want to show a few helpful tips about vim, that you can use in my tutorials about vim scripting in python
first of all
everyone should know the help command!
:help somecommand
syntax highlighting on in console
:syn on
set commands based on filetype
first set
:filetype on
now, vim will try to recognize the type of file you are editing,
then you can use
au FileType python source /path/to/python/commands
au, automatically execute on event
source, read the source file with commands
execute command from .vimrc without having to press enter
:someCommand()^M
and ^M you have to enter by typing <ctrl-v><ctrl-m> (so pressing those combinations)
In this blog I want to show a few helpful tips about vim, that you can use in my tutorials about vim scripting in python
first of all
everyone should know the help command!
:help somecommand
syntax highlighting on in console
:syn on
set commands based on filetype
first set
:filetype on
now, vim will try to recognize the type of file you are editing,
then you can use
au FileType python source /path/to/python/commands
au, automatically execute on event
source, read the source file with commands
execute command from .vimrc without having to press enter
:someCommand()^M
and ^M you have to enter by typing <ctrl-v><ctrl-m> (so pressing those combinations)
maandag 21 mei 2007
python scripting in vim (2)
Hi,
Hopefully you all found my first tutorial helpfull,
this will be a second more advanced tutorial about scripting vim in python.
In this tutorial we will make a script to test if your python script doesn't contain syntax errors, we will use pyflakes for this
let' s get started with the module pyflakse,
you can find pyflakes on http://divmod.org/trac/wiki/DivmodPyflakes
install it on ubuntu: apt-get install pyflakes
We will use pyflakes because it is fast, if you're interested you can also look at pylint and pychecker.
first let's do some tests with pyflakes
open some python interpreter:
>>>file = "/path/to/file"
>>>code = open(file, 'r').read()
>>>tree = compiler.parse(code)
>>>w = pyflakes.Checker(tree)
>>>for warning in w.messages: print warning
if your file contains an error, it should be shown. If the code has a syntax or indentation error, the compiler fase will fail but we will handle that in the script.
Now lets write this in a vim script,
we will write this script in a seperate file,
this is because we can keep or .vimrc clean and because we only want to load this file when we are editing python scripts (see this blog)
the script we will write, will toggle a buffer to show the errors. If no errors are found the scirpt will just write a message.
We write 4 functions,
checkSyntax
doSyntaxCheck
closeBuffer
bufferOpen
checkSyntax is the main function that you have to call when you want to have a map to this script
#!/usr/bin/python
import vim
import pyflakes
import compiler
def checkSyntax():
"""This function checks if the output buffer is already open. If it is open,
we will close it (because we want to toggle). If it is not open, we will
create
the output buffer and do the real syntax check with (doSyntaxCheck)
"""
#first save the current buffer
current = vim.current.buffer
#check if the buffer is open
b = bufferOpen()
if not b:
vim.command("bel silent new output")
output = vim.current.buffer
doSyntaxCheck(current, output)
else:
closeBuffer(b)
def doSyntaxCheck(current, output):
"""This function will do the real syntax check, first we will create a string
that contains
the current buffer, we will then try to parse the code with compiler and then
run pyflakes on it.
All errors are printed in the output window, if no errors are found, a message
is printed and the buffer is closed again
"""
#convert the list of lines to a string
code = "\n".join(current)
try:
tree = compiler.parse(code)
except (SyntaxError, IndentationError), inst:
output[0:0] = [str(inst).strip()]
else:
w = pyflakes.Checker(tree)
w.messages.sort(lambda a,b: cmp(a.lineno, b.lineno))
if w.messages:
for warning in w.messages:
output[0:0] = [str(warning).strip()]
else:
closeBuffer(output)
print "code ok"
def bufferOpen():
"""This function checks all the buffers if a buffer with a name containing
output exists. If it exists we return that buffer, else we return None
"""
for b in vim.buffers:
if "output" in b.name:
return b
return None
def closeBuffer(buffer):
"""Completely delete buffer"""
cmd = "bwipeout! " + buffer.name
vim.command(cmd)
Stay tuned...
I hope you all liked this tutorial.
reactions are always welcome, and I'll do my best to publish a new tutorial soon!
Hopefully you all found my first tutorial helpfull,
this will be a second more advanced tutorial about scripting vim in python.
In this tutorial we will make a script to test if your python script doesn't contain syntax errors, we will use pyflakes for this
let' s get started with the module pyflakse,
you can find pyflakes on http://divmod.org/trac/wiki/DivmodPyflakes
install it on ubuntu: apt-get install pyflakes
We will use pyflakes because it is fast, if you're interested you can also look at pylint and pychecker.
first let's do some tests with pyflakes
open some python interpreter:
>>>file = "/path/to/file"
>>>code = open(file, 'r').read()
>>>tree = compiler.parse(code)
>>>w = pyflakes.Checker(tree)
>>>for warning in w.messages: print warning
if your file contains an error, it should be shown. If the code has a syntax or indentation error, the compiler fase will fail but we will handle that in the script.
Now lets write this in a vim script,
we will write this script in a seperate file,
this is because we can keep or .vimrc clean and because we only want to load this file when we are editing python scripts (see this blog)
the script we will write, will toggle a buffer to show the errors. If no errors are found the scirpt will just write a message.
We write 4 functions,
checkSyntax
doSyntaxCheck
closeBuffer
bufferOpen
checkSyntax is the main function that you have to call when you want to have a map to this script
#!/usr/bin/python
import vim
import pyflakes
import compiler
def checkSyntax():
we will close it (because we want to toggle). If it is not open, we will
create
the output buffer and do the real syntax check with (doSyntaxCheck)
"""
#first save the current buffer
current = vim.current.buffer
#check if the buffer is open
b = bufferOpen()
if not b:
output = vim.current.buffer
doSyntaxCheck(current, output)
else:
def doSyntaxCheck(current, output):
that contains
the current buffer, we will then try to parse the code with compiler and then
run pyflakes on it.
All errors are printed in the output window, if no errors are found, a message
is printed and the buffer is closed again
"""
#convert the list of lines to a string
code = "\n".join(current)
try:
except (SyntaxError, IndentationError), inst:
else:
w.messages.sort(lambda a,b: cmp(a.lineno, b.lineno))
if w.messages:
else:
print "code ok"
def bufferOpen():
output exists. If it exists we return that buffer, else we return None
"""
for b in vim.buffers:
return None
def closeBuffer(buffer):
cmd = "bwipeout! " + buffer.name
vim.command(cmd)
Stay tuned...
I hope you all liked this tutorial.
reactions are always welcome, and I'll do my best to publish a new tutorial soon!
zondag 20 mei 2007
My first blog
Hi,
I just started a blog,
I will try to write regular about things I'm most interested in, like linux, ubuntu, python, kde.
Hopefully you like it,
Thomas
I just started a blog,
I will try to write regular about things I'm most interested in, like linux, ubuntu, python, kde.
Hopefully you like it,
Thomas

python scripting in vim (1)
This is a short tutorial about writing vim scripts in python.
This tutorial is for everyone who likes vim and python.
Preperations:
To write vim scripts in python you need to have vim compiled with +python
Fedora/CentOS: vim-enhanced
Debian/Ubuntu: vim-python
Let's get started:
first a thing about how you can use python for vim-scripting,
you can set these things in your ~/.vimrc
"first tutorial hello world
imap &:python pythonHelloWorld()
python << EOF
#start the function
def pythonHelloWorld():
import vim #so you can use the vim functions
buffer = vim.current.buffer #returns the current buffer
buffer[0] = "hello world"
#sets the first line of the buffer to "hello world"
EOF
What we have so far
a line starting with " is a comment in the .vimrc
imap &:python pythonHelloWorld()
press the & in insert mode to execute the command :python pythonHelloWordl(), notice the so you leave insert mode and go to the command mode.
python << EOF
everything between these lines will be read as python code
slightly improved version
We will improve the previous version so that we insert the "hello world" line before the current line, so we don't overwrite anything.
def pythonInsertHelloWorld():
import vim
buffer = vim.current.buffer
#returns the row and column of the current cursor
#position
(row, col) = vim.current.window.cursor
#python starts numbering from 0, vim from 1.
#insert line above current cursor position
#the argument must be a list, or it won't work
buffer[row-1:row-1] = ["hello world"]
EOF
and further...
this was the first really basic tutorial, more will follow soon, but you should have a start now.
If you have questions, see mistakes or have comments, please add your reaction.
see also:
about python scripting:http://www.tummy.com/Community/Presentations/vimpython-20070225/vim.html
in vim :help python
help about map: http://www.linux.com/article.pl?sid=06/06/08/1431210
This tutorial is for everyone who likes vim and python.
Preperations:
To write vim scripts in python you need to have vim compiled with +python
Fedora/CentOS: vim-enhanced
Debian/Ubuntu: vim-python
Let's get started:
first a thing about how you can use python for vim-scripting,
you can set these things in your ~/.vimrc
- autocmd FileType python [commands]
Run commands when this type of file is edited - python [python code]
Evaluate the python code given - python << EOF
Read python code untill the EOF - pyfile [filename]
Read python commands from a python file - map [keys] [command]
Run the specified command when the key(s) are pressed
"first tutorial hello world
imap &
python << EOF
#start the function
def pythonHelloWorld():
buffer = vim.current.buffer #returns the current buffer
buffer[0] = "hello world"
#sets the first line of the buffer to "hello world"
EOF
What we have so far
a line starting with " is a comment in the .vimrc
imap &
press the & in insert mode to execute the command :python pythonHelloWordl(), notice the
python << EOF
everything between these lines will be read as python code
slightly improved version
We will improve the previous version so that we insert the "hello world" line before the current line, so we don't overwrite anything.
def pythonInsertHelloWorld():
buffer = vim.current.buffer
#returns the row and column of the current cursor
#position
(row, col) = vim.current.window.cursor
#python starts numbering from 0, vim from 1.
#insert line above current cursor position
#the argument must be a list, or it won't work
buffer[row-1:row-1] = ["hello world"]
and further...
this was the first really basic tutorial, more will follow soon, but you should have a start now.
If you have questions, see mistakes or have comments, please add your reaction.
see also:
about python scripting:http://www.tummy.com/Community/Presentations/vimpython-20070225/vim.html
in vim :help python
help about map: http://www.linux.com/article.pl?sid=06/06/08/1431210
Abonneren op:
Posts (Atom)